 Steve Wilkes, Principal Engineer
I’m currently updating a legacy ASP.NET WebForms application to ASP.NET Core. Because big rewrites (almost) never work, it’s a case of migrating sections of the site one at a time, having WebForms pass specific requests to ASP.NET Core, with no change to the end user’s experience. How, you ask? With a couple of IIS tools and a sprinkle of web.config entries.
ASP.NET Core can be served via IIS, with IIS acting as a reverse proxy. Requests come into IIS, the ASPNetCoreModule routes them to Kestrel, and returns the results. In my scenario, the ASP.NET Core application is only ever accessible via WebForms, so it takes a little bit of setting up. Here’s how.
Setting up IIS
AspNetCoreModule
Firstly, you need the AspNetCoreModule. Luckily, you probably already have it - Visual Studio installs it into IIS for you. To check, open IIS Manager, and at the server level open Modules in the IIS section - you should see it listed there. If not, you can install it via the ASP.NET Core Server Hosting Bundle - here’s a direct link to download the installer: download!
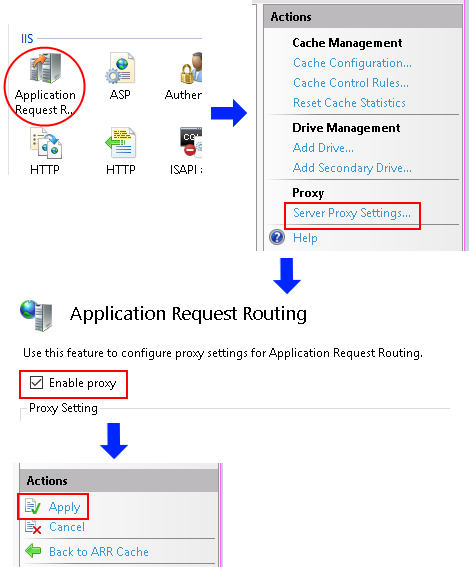
Application Request Routing
Next, you need the Application Request Routing module to route requests rewritten by the URL Rewrite module (try saying that ten times fast). You can install this via IIS Manager - click Get New Web Platform Components in the right-hand column to open the Web Platform Installer, then search for ARR, and look for version 3.0:

Once that’s installed, open Application Request Routing in the server-level IIS section (you may need to close and re-open IIS to see the icon), click Server Proxy Settings, check Enable proxy, and click Apply:
URL Rewrite
Finally, you need the URL Rewrite module. This you can also install via the Web Platform Installer - just search for rewrite, and look for version 2.0:

Setting up ASP.NET Core
Firstly, you need IIS integration in your application. This is super easy, and you probably already
have it - it’s simply a call to UseIISIntegration() on the WebHostBuilder in your Program.cs.
If you’re missing it, UseIISIntegration is an extension method from the
Microsoft.AspNetCore.Server.IISIntegration
NuGet package.
That one line is all you need in your ASP.NET Core application - now you just publish the project. You can use a File System publish, go via WebDeploy, or whatever you prefer.
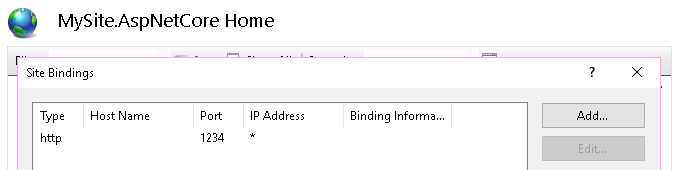
Finally, set up an IIS website pointing to your ASP.NET Core publish directory. Because this website will be accessed via WebForms only, bind it to a non-public port number - I’ll use 1234 for our example:
Setting up WebForms
Finally, you need to tell WebForms to send the appropriate requests to ASP.NET Core.
You can do this with rules in your web.config which configure the URL Rewrite module. For example,
say you’ve migrated your news pages to an ASP.NET Core NewsController, the following rules tell
IIS what to do with requests for the ASP.NET Core ‘news’ section:
<system.webServer>
 <rewrite>
  <rules>
   <rule name="AspNetCoreContent" stopProcessing="true">
    <match url="^content/(.+)$" ignoreCase="true" />
    <action type="Rewrite" url="http://localhost:1234/content/{R:1}" />
   </rule>
   <rule name="AspNetCoreNews" stopProcessing="true">
    <match url="^news(.*)$" ignoreCase="true" />
    <action type="Rewrite" url="http://localhost:1234/News{R:1}" />
   </rule>
  </rules>
 </rewrite>
</system.webServer>
Both rules have the same pattern: they both capture requests with URLs beginning with particular
strings (content/ and news, respectively), and rewrite them to requests on port 1234 on the
local machine. The {R:1} reference in the rewritten URLs is replaced with the captured group from
the regular expression which matched the request URL. The content/ rule allows the ASP.NET Core
application to reference static files in a content directory in its wwwroot, and have IIS
route those requests back to the appropriate place.
And that’s it! A page-by-page migration is underway with a few simple steps.
Comments
5 comments